 Build a Simple Circuit:
Light a Bulb With a Battery (STEM for Kids)
Light a Bulb With a Battery (STEM for Kids)
Have you ever wondered what makes a lightbulb shine or a toy car zoom? It all starts with electricity flowing through a circuit. In this hands-on experiment, kids and parents work together to build a simple electrical circuit using a battery, bulb, and wires. Designed for grades 3–6 (but fun for all ages), this activity is the perfect introduction to the basics of circuits, energy transfer, and cause and effect. You’ll find step-by-step directions, printable worksheets, teaching tips, safety notes, and a full scientific explanation—so you can confidently guide your child to “aha!” moments in science.
Experiment Details
- Grade Level: 3rd–6th Grade (adaptable for K–8)
- Key Topics: Electricity, Circuits, Energy Transfer
- Estimated Time: 30 minutes
- Mess Factor: Very Low
Purpose: To learn how electricity flows through a closed circuit and powers a bulb, using household materials.
Hypothesis: If we connect the battery and bulb in a complete loop with wires, then the bulb will light up because electricity can flow through the circuit.
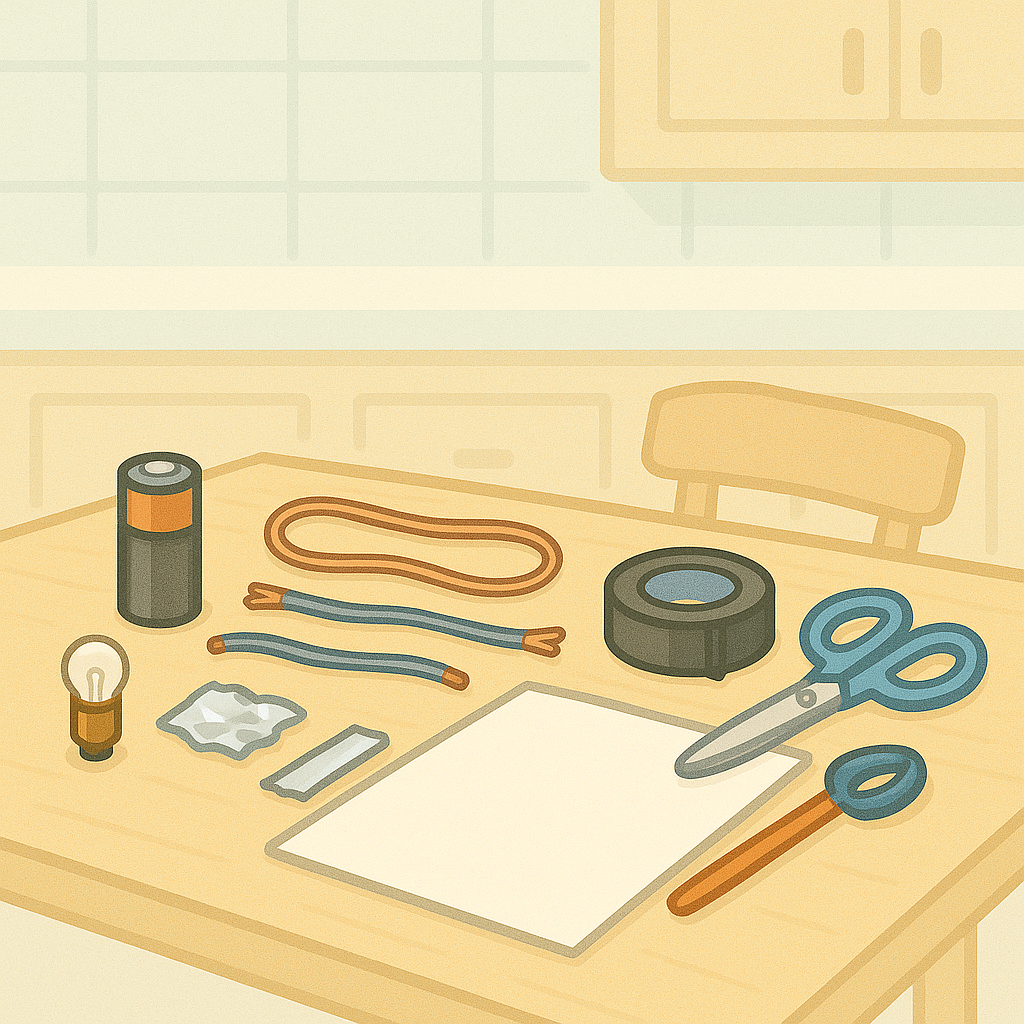
What You’ll Need
- 1 small flashlight bulb (3 volts recommended)
- 1 AA battery (1.5 volts) or two AA batteries in a battery holder
- 2 insulated copper wires (about 6 inches each, with stripped ends)
- 1 small piece of aluminum foil (about 2 x 2 inches)
- Electrical tape or clear tape
- Scissors (for adult use to strip wires if needed)
- Paper and pencil (for diagrams and notes)
Step-by-Step Instructions
- Prepare the wires: If your wires aren’t already stripped, have an adult use scissors to remove about ½ inch of insulation from both ends of each wire. Explain to your child that this exposes the metal, which allows electricity to flow.
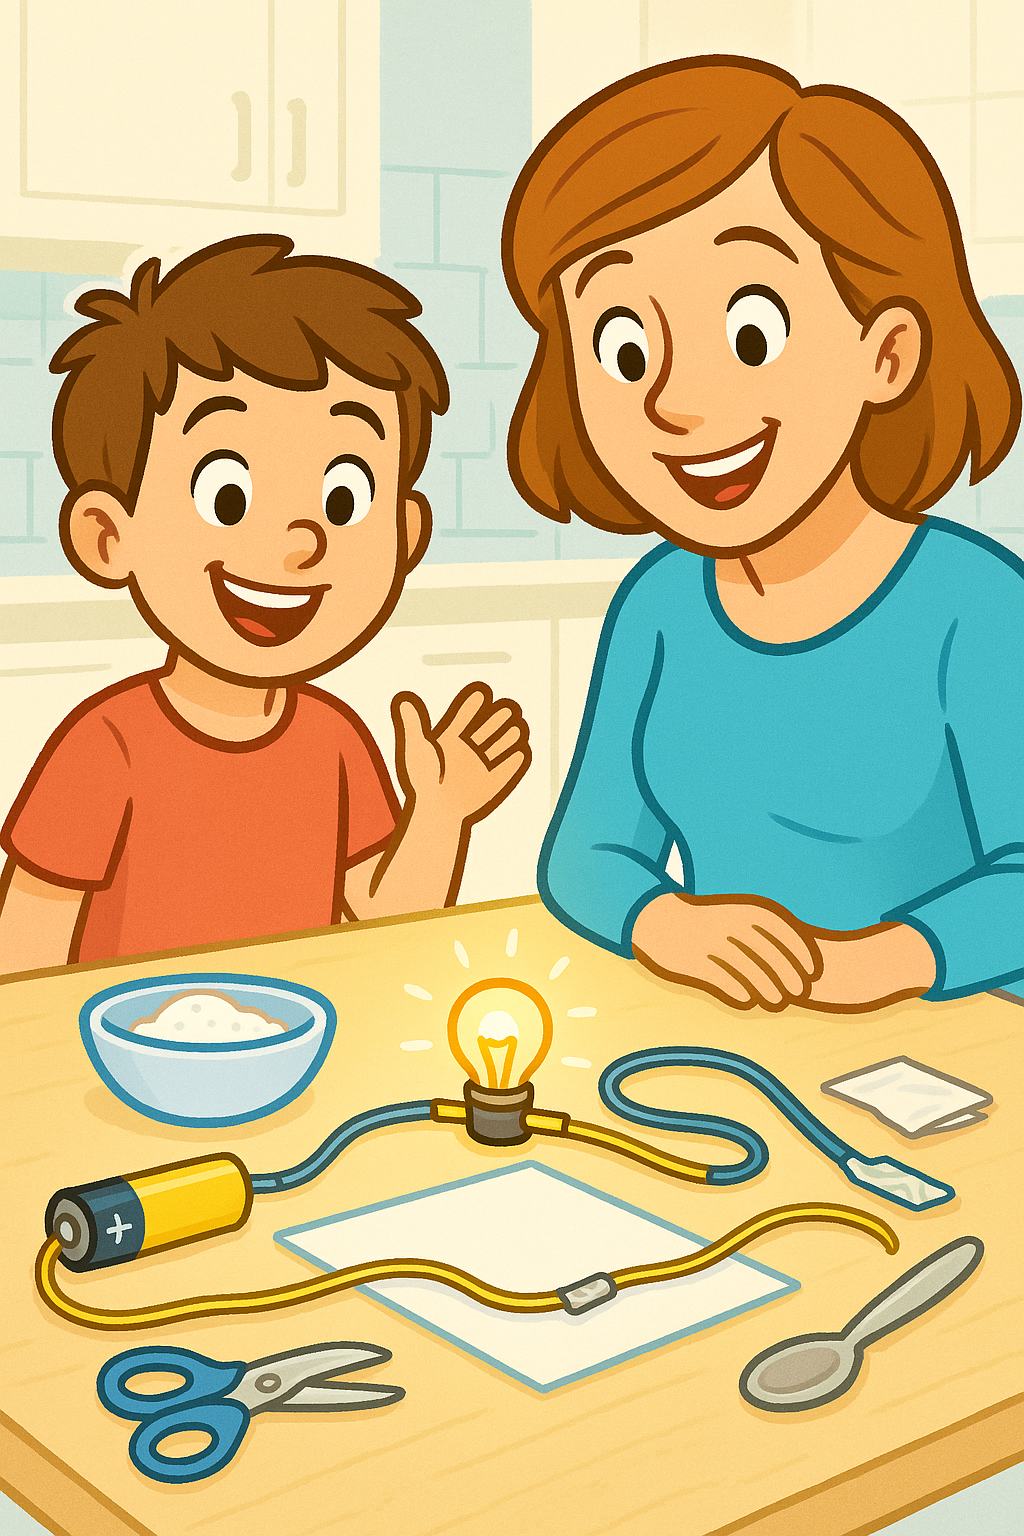
- Connect the battery (positive side): Tape one end of the first wire securely to the positive (+) end of the battery. Ask your child to notice the markings on the battery and practice identifying positive and negative.
- Connect to the bulb: Attach the other end of the same wire to the metal base of the bulb (the small metal tip on the bottom). Tape it so it stays in place, and encourage your child to observe how metal-to-metal contact matters.
- Complete the bulb connection: Tape one end of the second wire to the side of the bulb (the threaded metal part). Ask your child to describe the path electricity is taking so far.
- Connect to the battery (negative side): Attach the other end of the second wire to the negative (–) end of the battery. Secure with tape, making sure all connections are tight.
- Test the circuit: Ask your child, “What do you predict will happen?” When all the connections are made and the circuit forms a loop, the bulb should light up! If not, check all connections and be sure the wires are touching metal at each point.
- Break the circuit: Gently disconnect one wire and observe what happens. Guide your child in noticing that the bulb turns off when the circuit is broken—there’s no complete path for electricity.
- Try a switch: Show your child how to use a folded piece of aluminum foil as a simple switch. Place the foil between a wire and the bulb’s metal side; open and close the circuit by touching or removing the foil. Ask, “Why does the bulb turn on and off?”
- Draw a diagram: Invite your child to sketch the circuit they built. Label the battery, wires, and bulb, and use arrows to show how electricity flows in a loop.
Results & Scientific Explanation
When your child completes the circuit by connecting the battery, bulb, and wires in a closed loop, electricity flows from the battery’s positive end, through the wire, into the bulb’s metal base, across the filament, and back to the negative end of the battery. This flow of electric current makes the bulb light up! If any part of the circuit is disconnected, the flow stops and the bulb turns off. The aluminum foil “switch” lets your child experiment with opening and closing the circuit, introducing the real-world concept of how switches work in homes and electronics.
- Closed circuit: All connections are secure and electricity flows—the bulb lights up.
- Open circuit: There’s a break in the path, so electricity cannot flow and the bulb stays dark.
- Switch: A device (like foil) that opens or closes the circuit, controlling whether the bulb is on or off.
Teaching the Why: How Circuits Work
Electricity always seeks a complete path from the power source, through a load (the bulb), and back to the source. This is called a closed circuit. If there’s a gap or break—a wire not connected, a switch turned off—it’s called an open circuit and electricity can’t flow. Most household electronics, lamps, and even cars work on the same principle!
Real-Life Connections
Encourage your child to look for circuits at home: light switches, remote controls, even battery-powered toys. Understanding simple circuits lays the foundation for more advanced learning about energy, electronics, and technology.
Learning Objectives
- Understand the basic components of an electrical circuit.
- Learn how electricity flows in a closed loop.
- Develop hands-on skills in connecting a battery, wires, and bulb safely.
- Explore what happens when the circuit is complete vs. broken.
- Make and test predictions about circuits and record results.
Teaching Tips for Parents
- Emphasize Safety: Remind children not to touch exposed wire ends while the circuit is connected, and supervise wire-stripping and battery use.
- Use tape for secure connections: Demonstrate how loose connections can prevent the circuit from working—encourage careful taping.
- Highlight open vs. closed circuits: Use clear language (“complete loop” vs. “broken loop”) and have your child practice turning the bulb on/off with the foil switch.
- Encourage prediction and observation: Ask “What do you think will happen if…?” and have your child record their predictions and results.
- Diagram together: Drawing the circuit reinforces science and supports cross-curricular learning (art, labeling, arrows for flow).
- Extend the activity: If you have extra bulbs or batteries, try connecting more than one bulb, or change the arrangement and observe what happens.
Standards Alignment
NGSS 4-PS3-2: Make observations to provide evidence that energy can be transferred from place to place by electric currents.
NGSS 4-PS3-4: Apply scientific ideas to design, test, and refine a device that converts energy from one form to another.
Printable Worksheet
Want a ready-to-use printable worksheet for your homeschool science notebook?

Frequently Asked Questions
Yes—with adult supervision. Use low-voltage batteries (AA or AAA) and never use a wall outlet for circuit experiments. Always supervise the use of scissors and battery connections.
Double-check all connections—wires must touch metal parts, and tape must hold wires tightly. Try new batteries or bulbs if needed, and make sure wires are stripped enough for good contact.
Yes! Experiment with different bulb sizes or add another battery (in a holder) to see if the bulb gets brighter. Just make sure not to exceed the bulb’s voltage rating.
Every lamp, flashlight, or electronic device uses circuits! This experiment shows the basics behind how household electricity works—just on a safer, smaller scale.
Related Experiments
- Balloon Rocket Race
- Lava Lamp in a Bottle
- Homemade Rock Candy Crystals
- See All Science Experiments & Generator
Share Your Results!
Did you try this experiment? Share your photos, results, or questions below!
⭐ What Parents & Teachers Are Saying
Recent Feedback
There are no reviews yet. Be the first one to write one.